Lighting in GTA 2 Maps
Dusk mode in GTA 2 gives the game an amazing atmosphere, so adding lighting to your levels is a great idea. It takes a long time and you may find yourself deleting all your lights are starting again once or twice. However, with the help of this guide, hopefully you will get most of them done well first time.
Setting Up
Firstly, finish whatever landscape you are making. If you spend several weeks adding lighting, then realise you want to rebuild a section of the map you will have to spend a load more time re-lighting that section. Therefore, do not add lighting until your landscape is quite complete.
Once you are ready to start, begin with the big roads. Do not add lights to places where you want to add traffic lights (GTA 2 Landscape Zones) because the traffic lights will illuminate these areas. I recommend leaving a space like this:
I recommend using the Edit > Lights > View Markers option so you can see exactly where your lights have been added. By double-clicking a marker the editing window loads up with that light selected, so it makes editing your existing lights really fast. I suggest using a pretty low ambient light level so you can see the effects of your lighting. Somewhere between nothing and five bars suits my screen. Note that this ambient light setting is just for editing purposes and is not saved into the map.
Adding The First Light
Select the first place that you want to add a light above. I recommend you start at the top left (North-West) and to the right (East) of the nearest junction where you intend to add traffic lights. Place your lights directly above the kerb by selecting the block just below (South) and to the right (East) of it.
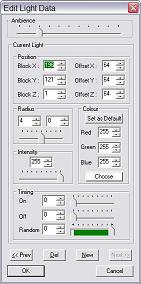
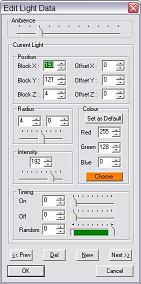
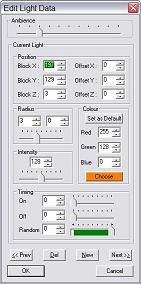
Press Alt+L or use the Edit > Lights > Edit menu to bring up this dialog box:
If your road has 4 or more lanes, I recommend these settings:
If your road has 3 or less lanes, I recommend these settings:
Confirm the settings by clicking OK and you will have created your first light. There will now be a little pyramid marking where that light is. Double-click it to view the dialog window for that particular light.
Some Basic Rules
Street lighting is normally done by governments and so it follows strict guidelines. Your city should use a proper set of standards for its lighting - especially on the streets. Do not be tempted to put your lights close together because there will be very little contrast in the game. Set lights about six blocks apart and put them on alternate sides, so no two lights will be within about twelve blocks on one side.
There should always be a light opposite a junction where it is a T-junction with no traffic lights. There should also be a light on the vertical part of the T shape on the side where the vehicles stop before entering the horizontal part.
This is what I mean:
Even though the lights will sometimes not alternate sides of the road, or will be quite close to each other, junctions should be well lit. This way your city seems more authentic and your dark alleyways will seem very different to your fully lit streets.
Lighting up Areas
Because there will normally be areas of your city where the street lights do not reach, you will need extra lights. I like making floodlights for industrial areas, like this:
For smaller areas with a fence nearby, using little lamp posts is better:
You should normally choose a colour which matches the thing it is lighting up when doing areas like this. If you are lighting up a field, use green and if you are lighting up water then use blue. However, if you want the water to look polluted then use a green or brown.


